

How to Have a High Quality Live stream: Home Studio Setup
.png)
Did you know that you can create an at-home studio for live streaming (or even video conferencing) with just the supplies you have lying around your office or home? Before you press “add to cart” on some expensive gadget promising to give your stream that extra boost you’re looking for, try these easy at-home-studio hacks!
Keep reading to add a few free online streaming improvements under you tool belt.
"...these same techniques can be easily translated to whatever live streaming platform you might be using - so you can ensure the best live streaming service and quality to your audience."
Improve Home Studio Set up for Live stream
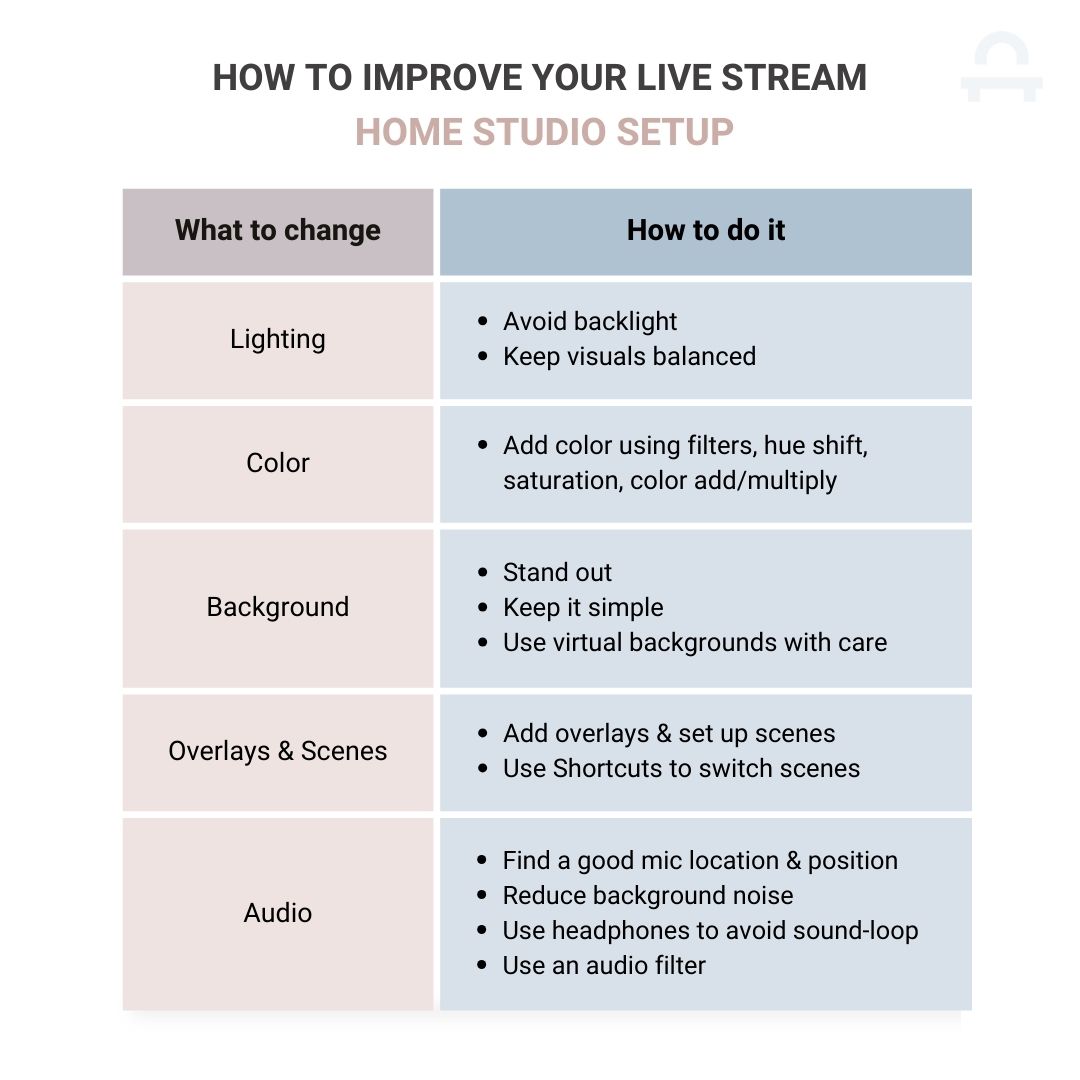
For a quick overview, these are the tips we'll be covering today:
Easy Home Studio Lighting Hacks
While lighting might not be something you consider while watching a livestream (unless you’re like me and you do), it’s certainly something to consider when you’re setting up your own space to stream. If you’re looking to quickly improve your live stream quality, lighting is a great first step. So dust off a couple of old lamps from the attic and let’s get started!
Avoid Backlight
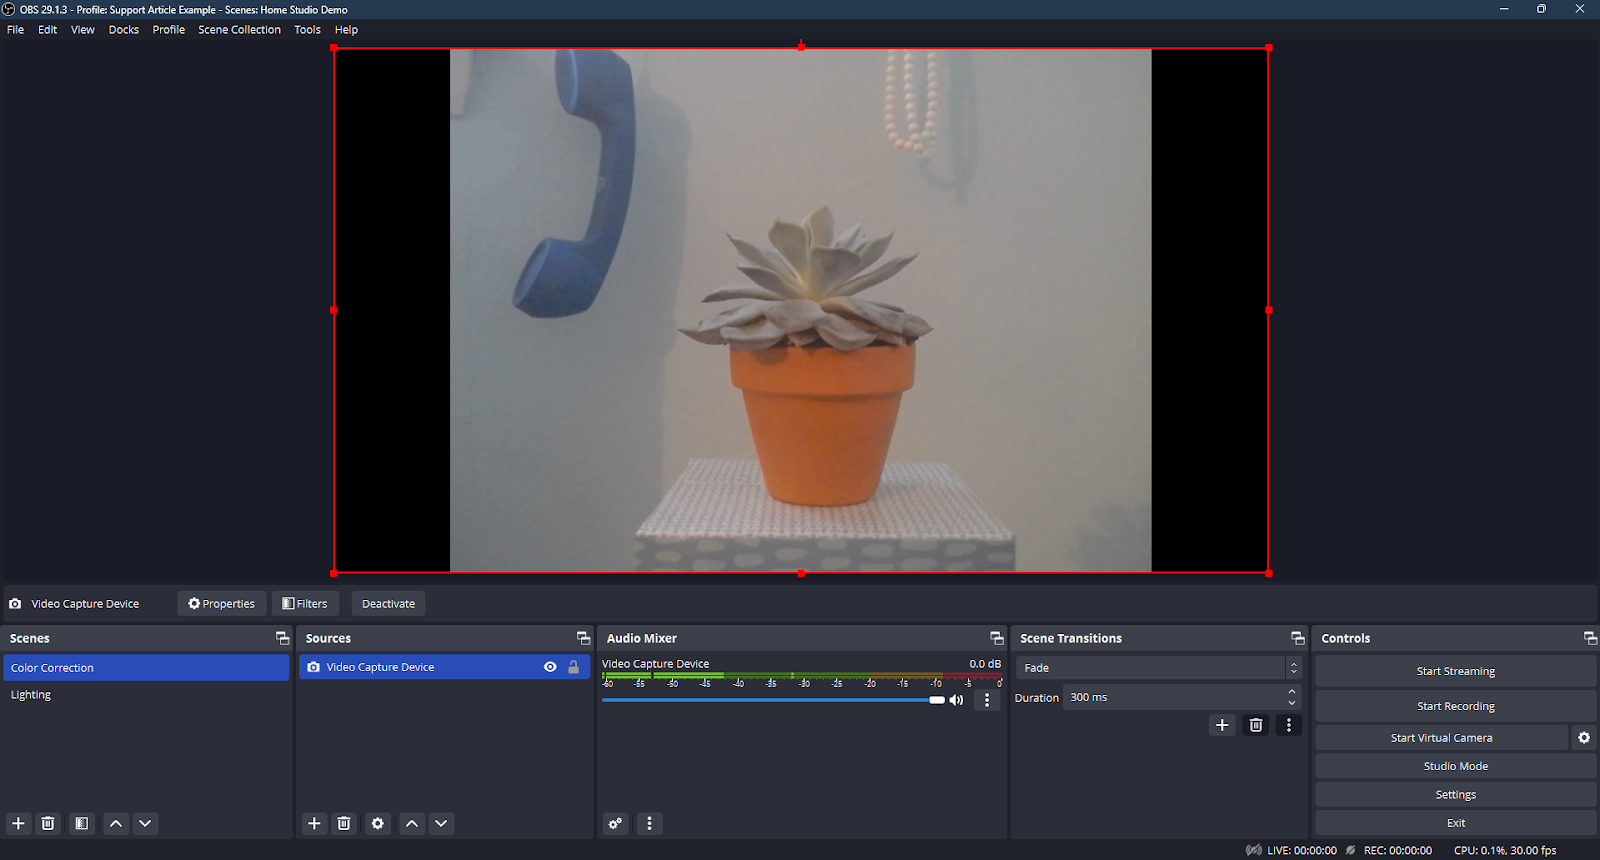
While it might seem that adding more light is the way to go, sometimes less is more. Strong sources of backlight can create disorienting shadows and can make the foreground (you) appear darker or less detailed. Here’s an example of a backlit object.

While it might look dramatic, it’s not the ideal lighting situation for a speaker or presenter on a livestream. To avoid these effects, try staying away from strong lamps and windows (a huge backlight killer), and try changing the lighting of the room you are in to be more uniform.
Keep things balanced
Of course, you need some light in your stream! Placing lights in front of you (but not shining directly on you) and to both the right and to the left can create a gentle lighting effect. It’ll help remove dramatic shadows while still providing the necessary light. To get the best effect, adjust the positioning and brightness of these lights until it appears that there isn’t a light source shining directly on you, but you are still being illuminated.

It might seem silly, but just using strategically placed everyday lamps from around your house can drastically increase the clarity of your stream (and might even give you a bit of a “glow”).
If you do decide you want to invest a bit more into your home studio setup, consider starting with a ring light. They can be relatively inexpensive, and provide an even light source when used properly (there’s a reason they’re so popular)!
Add Color to Your Live Stream
Most of the time, you’ll turn on your webcam or external camera and see something that looks like your studio, but is just a bit…off. While video cameras and webcams may be great at catching details, they often represent color a little differently than we’d expect (even if they have a high resolution).
Let’s take a look at adding a bit of that color back in using filters. Here’s an image of an unfiltered webcam source.
It looks good, but the back wall appears to be more yellow/green than blue. In fact, it looks like the whole capture has a bit of a yellowed hue to it. Let’s see if we can make the colors a bit closer to what they are in real life.
To add a filter in OBS, right click on the source you would like to adjust, then press “filters” at the bottom of the context menu. For this example, we’ll add a color correction filter (located under the “effects” section). We’ll use hue shift to change the overall hue of the output to be less yellow, increase the saturation (color intensity) just a bit to make the colors less dull, and use the color add/multiply features to bring out more of the blue hues.
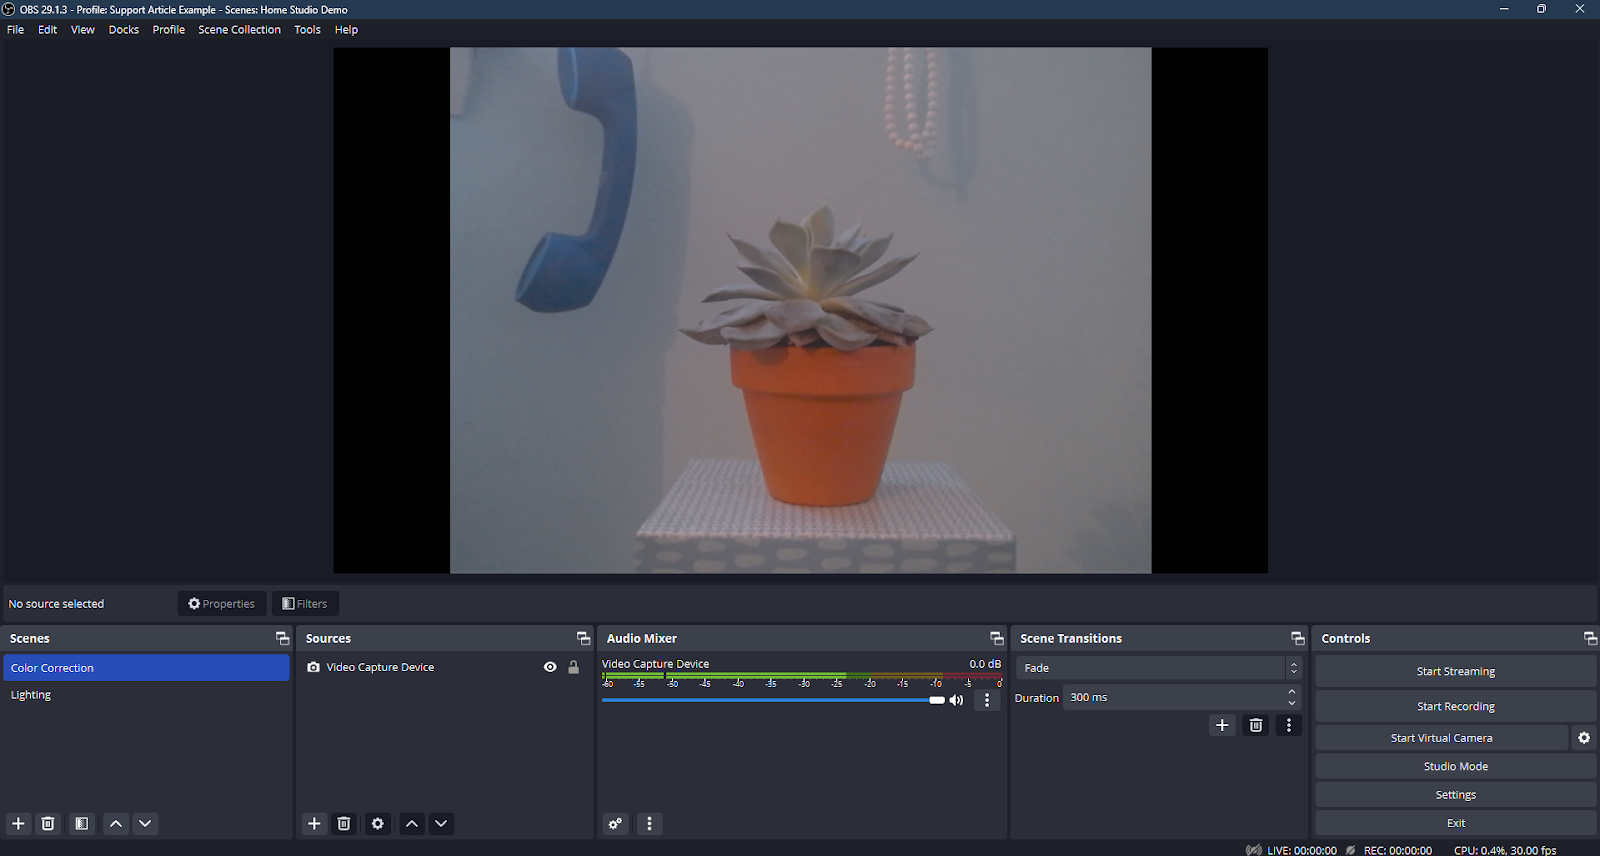
There, much better!
Note: Color correction can take a bit of trial and error - don’t be afraid to create multiple different filters until you get one you like.
Home Studio Background Tips & Tricks
Now that you’ve got your camera and lighting set up, you may be looking at your studio space and wondering whether or not it was worth improving your setup if there’s still a pile of clutter in the background. Here are a few tips to make sure your background compliments your livestream.
Stand out
No matter what your backdrop is, you want to be able to distinguish it. Consider avoiding colors that might cause you to accidentally “blend in” and camouflage yourself against the backdrop. For example:
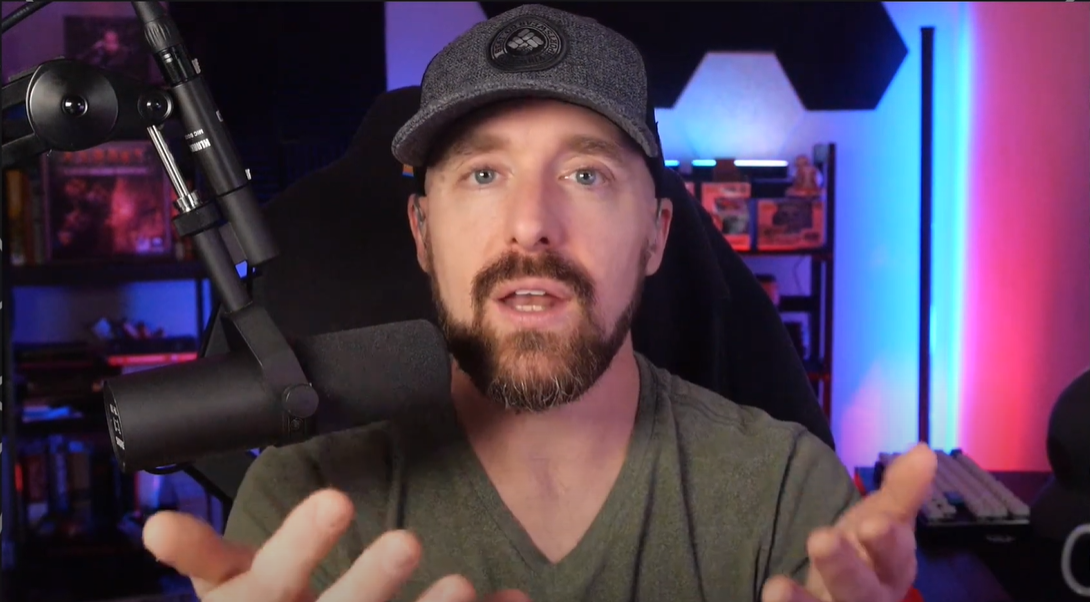
The speaker’s background is complicated, but he's wearing colors that clearly stand out from the background. The camera is also focused on the foreground, making it easy for your eyes to decide what they should focus on.
Keep it Simple
Sure a colorful and wacky backdrop might be fun, but it might be distracting. Keeping your background simple helps the audience focus more on what you’re saying and less on what’s around you. Here’s an example:

The speaker’s background has some texture to keep it interesting, but the lack of color draws your eyes to focus on him - and ultimately what he’s saying.
Note: Special thanks to The Online Church Blueprint for letting us use them as an example - check out their podcast on all things Digital Church here!
Use virtual backgrounds with care
If you’ve ever joined an online video conference meeting, you’ve probably either seen or used a virtual background before. Virtual backgrounds can be a great way to quickly hide an unsightly pile of clutter or even just add a little life to a meeting.
However, if you’re looking to improve how your virtual background looks, you might want to consider doing a little bit of setup beforehand. To get the best looking virtual background, your goal is to make it as easy as possible for the program to tell what’s in the foreground (you) and what’s in the background. Harsh lighting, complicated backgrounds (like shelves), and similar colors are all confusing to the program as it tries to figure out what to replace.
Here’s an example using a small mannequin - currently, he’s in front of some messy shelves, but let’s give him a nice clean background.
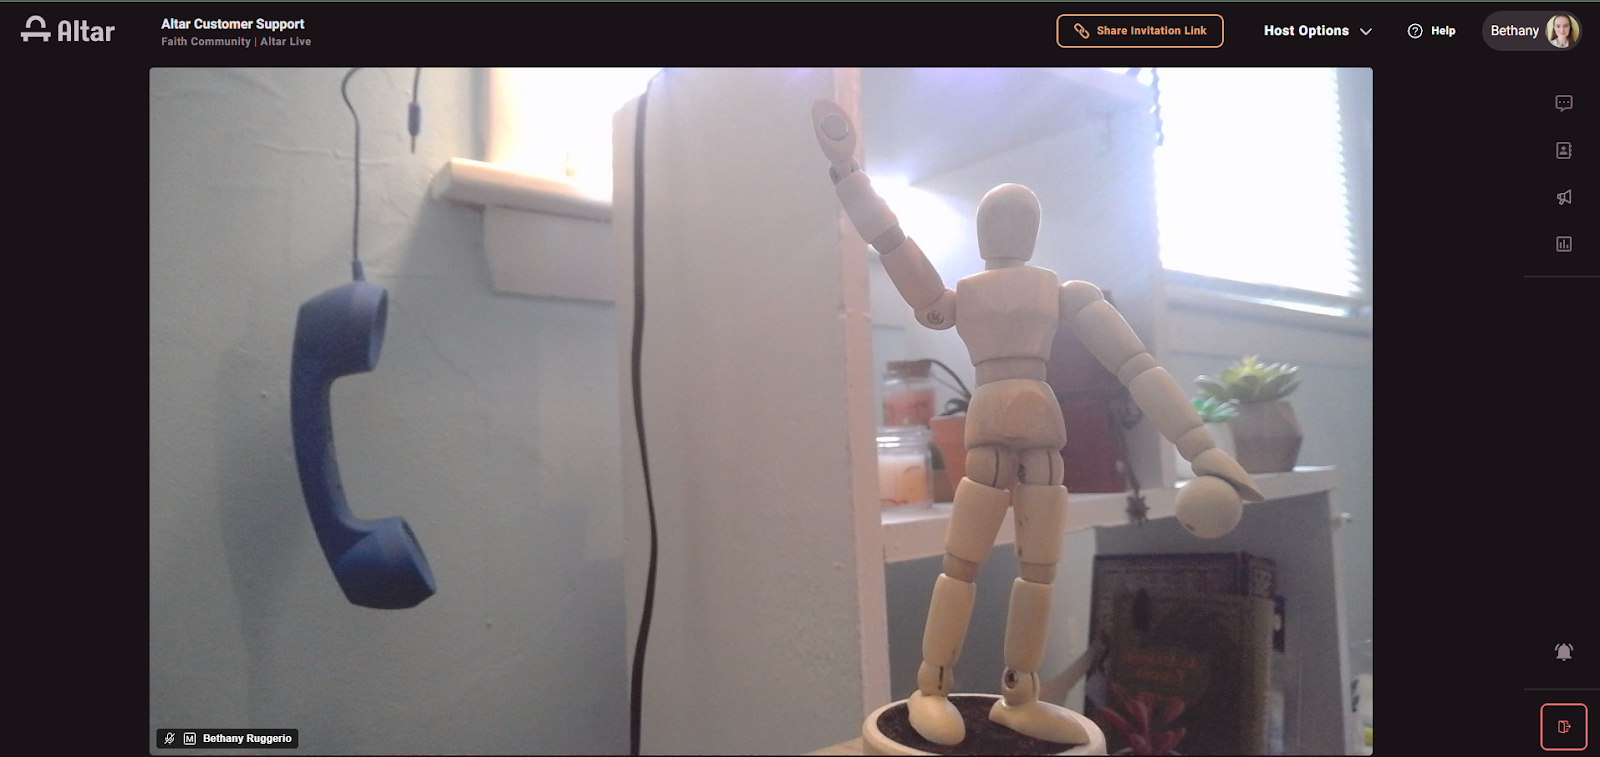
Let’s start by just adding a virtual background without making any changes.

As it is, the background shelves are making it too difficult for the program to pick up on the mannequin in the foreground. With too much “clutter” behind it, the program thinks the mannequin is just another distraction to be replaced.
Let’s simplify things and try holding a solid white board behind the mannequin.
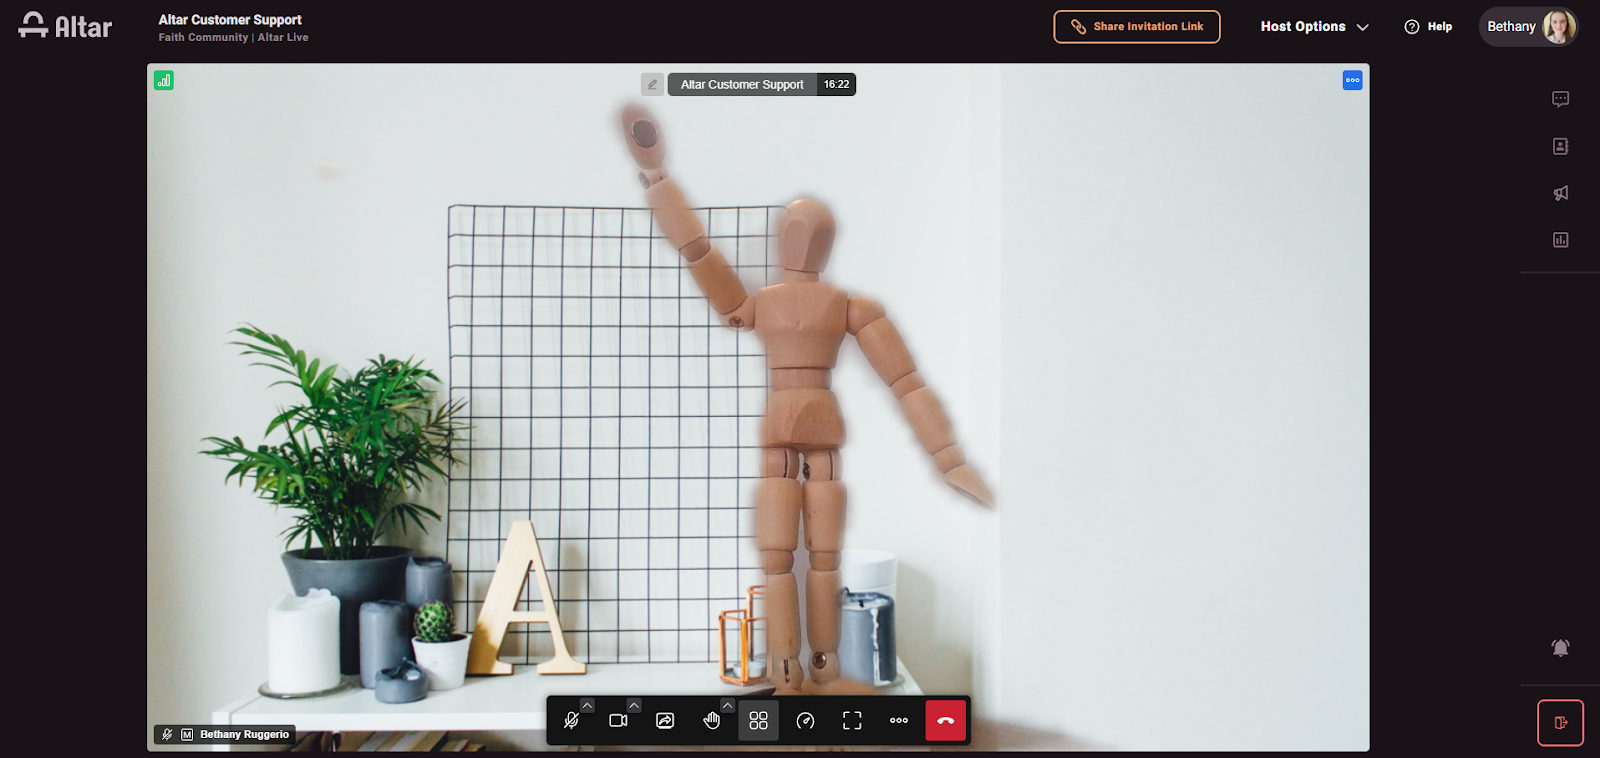
Much better! There’s still some feathering around the edges, but the mannequin no longer seems to be fading in and out of the background. The software can now clearly see what’s in the foreground and replace the background.
Tip: Looking for high quality video conferencing, but tired of juggling Zoom keys? Check out Meetings on Altar Live (which yes, include virtual backgrounds, emoji reactions, polls and more)!
Adding Overlays and Scenes to your Stream
Often, live streams are more than just a camera focused on someone talking - there’s overlays, images, and sometimes screen shares. While you can just press “go live” on YouTube or Facebook, running your livestream through a Livestream Studio such as OBS can really bring your stream to the next level.
For today's example's we'll be using OBS studio to demonstrates how to improve home studio streaming quality. OBS Studio, short for Open Broadcaster Software Studio, is a popular and open-source software application that serves as a powerful tool for live streaming and video recording. OBS Studio offers extensive customization and configuration options, making it a go-to choice for those seeking full control over their live streaming setups.
Although we will teach you step by step how to improve streaming quality for OBS, these same techniques can be easily translated to whatever livestream service or platform you might be using -- so you can ensure the best live streaming service and quality to your audience.
Adding an Overlay
We’ve already looked at using OBS studio for color correction, but now, let’s look at adding a simple logo overlay in OBS.
First, under “Sources”, add a new source. For this example, we’ll add an image. Then, in the viewer, we can position and resize the source until it’s where we want it.
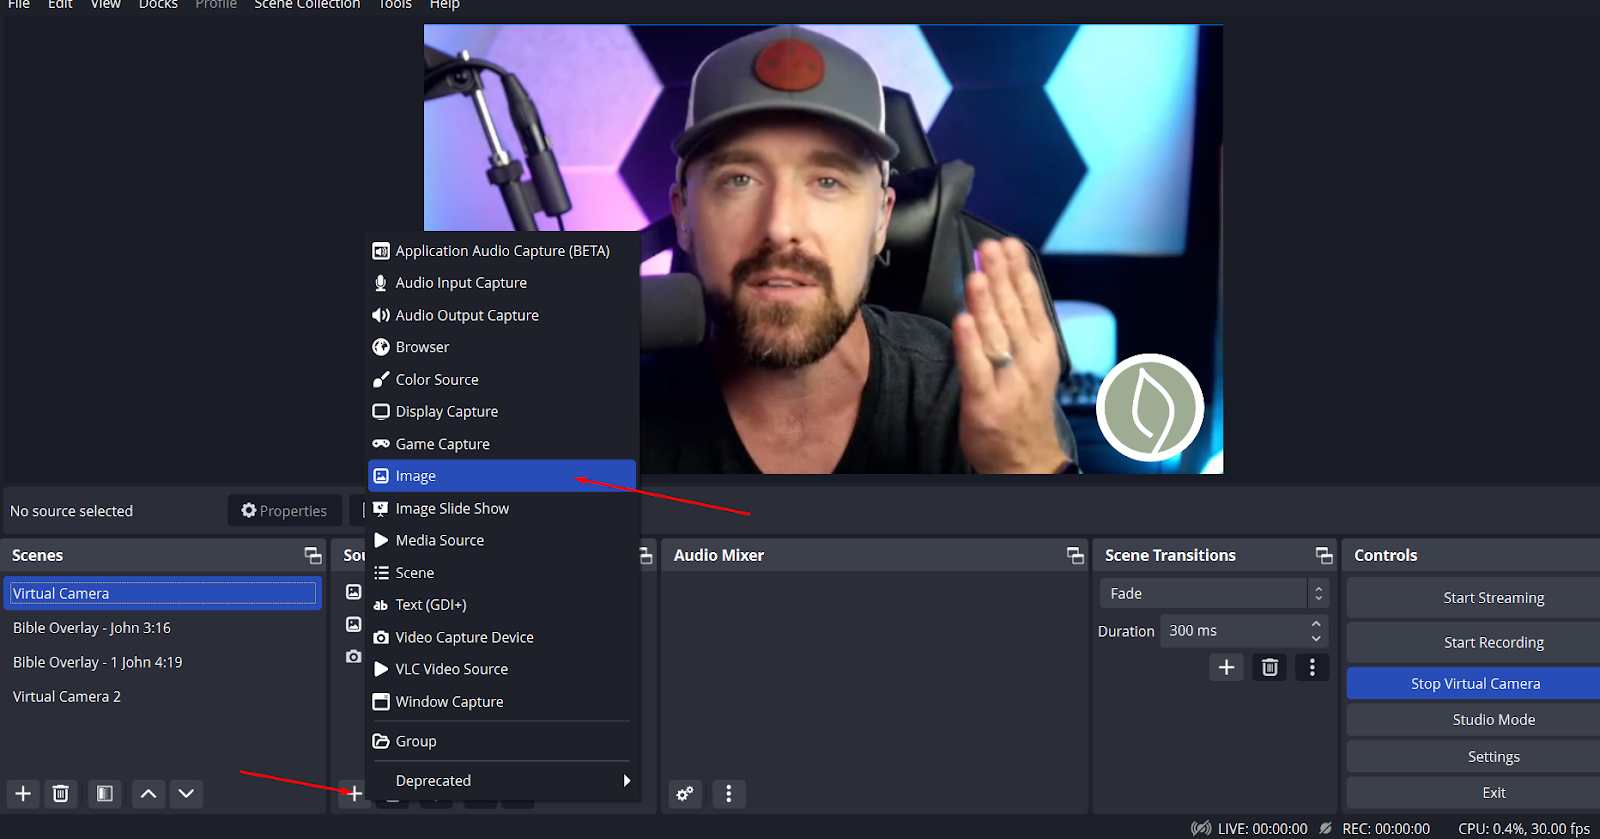
Tip: Sources appear in the order they’re listed under the “Sources” tab. Sources at the bottom of the list are in the back, while sources at the top of the list are at the front.
You can add as many overlays to your stream as you’d like - just remember, the goal is to enhance, not detract, from the stream.
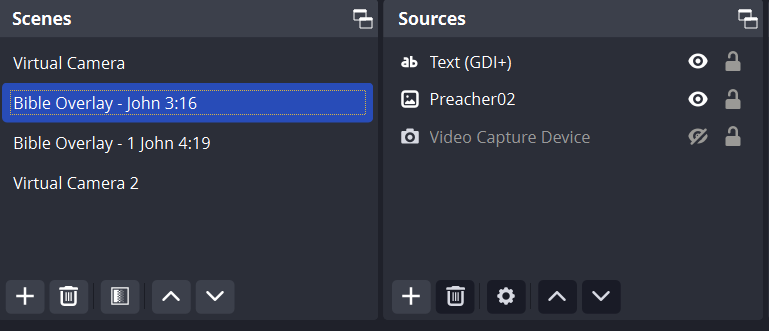
Setting up Scenes
Scenes are a great way to quickly switch between collections of overlays. While you’re livestreaming, you want to be focused on the audience and what you’re saying, not moving overlays around. By creating scenes before you stream, switching things up is as simple as pressing a button.
To create scenes in OBS, press the “+” icon under “Scenes”. Then, add sources to the scene, just as we did in the previous section. Each scene’s sources will only appear when that scene is selected.
While streaming, simply click on the scene you want and the webcam output will transition in real time.
Use Switching Shortcuts in OBS
Even though switching scenes is as easy as pressing a button, it can be made even easier by using shortcuts. If you have multiple tabs open, it can be a pain to search through them all, find your streaming software, and then change the scene. Fortunately, live stream studio programs allow you to create shortcuts for your scenes.
How to create a scene shortcut in OBS
To create a scene shortcut in OBS, go to File > Settings > Shortcuts, and scroll to the bottom of the list. There, you can assign keys to become shortcuts to different scenes - just be sure you don’t use a shortcut that is already being used by your system (like ctrl+c).
Cleaning up the Audio
We’ve got the lights, we’ve got the camera, now… action? Not quite, we still have one more element to set up - audio. Audio is a bit harder to work with on a budget, since a good quality mic really makes a world of difference. However, there are a few simple hacks you can use to improve your existing setup’s quality.
Location, location, location
This might seem like a simple one, but it’s easy to forget. The positioning of your mic makes a huge difference in audio quality. Keeping your mic close to you not only increases the volume of your audio output but also the quality. There’s a reason you see the mic in many live streams - sure they might be trying to show off their fancy new setup, but they are also making sure their voice can be heard clearly.
Reduce background noise
Even though many mic setups have built in noise reduction systems, it’s a good idea to keep unwanted noises to a minimum. A room might seem quiet, but actually turning on a mic and listening to the recording is a good way to find out.
Often, noises are so far in the background that we don’t pick them up, but our microphones can. If possible, turn off any fans or other electronics that might produce low pitched background noise, and move your mic away from the ones you have to keep on. Computers (which obviously have to stay on), refrigerators, and heaters are some of the most popular culprits.
Use Headphones
Whenever you’re livestreaming or on a video-conference call, using headphones can reduce the risk of a sound-loop. If both your mic and computer’s audio are on, the mic may pick up audio from your computer and play it back into your livestream or call. This can create at best an annoying echo loop, and at worst a high-pitched noise. Consider using earbuds or headphones to eliminate the risk of an unwanted guest screech in your stream.
Use an audio filter
Just like with the camera output, programs such as OBS allow you to filter audio output. And just like with the color-correction we did earlier, it can be a bit tricky to figure out at first, so don’t be afraid to experiment!
OBS has an official article on their audio filters with an in-depth explanation that is great for learning how audio filters affect your final product (and for figuring out the difference between a compressor and a limiter). Here’s a quick summary of a few of the filters they list:
- Compressor: reduces risk of “peaking” (when loud sounds are too loud for the mic to handle)
- Gain: increase volume (handle with care!)
- Expander: detect and reduce quiet sounds
- Noise Gate/Suppression: reduce background noises
While using filters can’t increase the quality of your microphone, it can increase the clarity of your output - making your voice easier to hear and understand.
Now that you've learned how to improve streaming quality on OBS, you can expand the reach of your content through integrations with other apps. Learn more about Altar and OBS integrations.
Conclusion
“A craftsman is only as good as his tools” might be true, but it also matters how he uses them. With a few items lying around your house, some software, and a little know-how, you’ll be well on your way to creating a stellar at-home live streaming studio.
Wishing there was a better way for your audience to interact with both you and each other? Check out Altar Live -
- Live watch party rows
- Post-stream meeting rooms and lobbies
- Automated announcements and polls
- And More!
The best part? It works right along side your existing stream provider. Get started with a 30 day free trial and check it out for yourself!
Get started on Altar's top rated live streaming service free for 30-days

Rated Best livestream platform for church services online
Altar Live is a separate platform designed specifically for virtual events and online worship services, often used by religious organizations. It offers a unique and comprehensive solution for hosting interactive and engaging virtual gatherings.
While OBS Studio is primarily a software tool for content creators and live streamers to broadcast their content on various platforms, Altar Live complements OBS Studio in the context of virtual worship services.
Altar Live provides features like interactive prayer requests, group chat, and virtual lobbies, making it a specialized platform for faith-based communities to enhance their online worship experience. Users often integrate OBS Studio with Altar Live to further enhance increase OBS stream quality by adding an interactive element to virtual services, ensuring a seamless and engaging experience for their congregations.
Altar Live is a dynamic live streaming platform designed to elevate the livestream service quality for live streamers and churches. It integrates seamlessly with OBS to enhance stream quality by accommodating multiple sources, and it even offers a convenient mobile app. Altar Live empowers users to incorporate high-quality audio sources like Spotify, enriching the live streaming experience and making it a valuable resource for those looking to create engaging and immersive virtual gatherings.
Why Upgrade the Quality of Your Live Streaming Platform
Live events and streaming videos have become an integral part of our online experience. Whether you're a seasoned content creator or just starting to dip your toes into the world of live streaming, achieving a high-quality live stream is essential to captivate your audience and provide an ad-free, immersive viewing experience.
To embark on this journey, you'll need the right tools and setup, which is why we're here to guide you through the process of creating a top-tier home studio for live streaming. From selecting the ideal video source and live streaming software to optimizing sound quality with audio mixers and exploring hardware encoding, there's a wide price range of great options to suit your needs. But to start, these free online streaming upgrades can go the distance in truly improving your stream quality and viewing experience.
Whether you're looking to start streaming or enhance your current setup, try your hand with these techniques to level up your streaming experience for both mobile devices and desktop viewers.


